Miscellaneous Devices
A collection of various devices for use on and off the water
Besides boat, paddle, PFD, spray deck, etc. a whole collection of other items enhance the paddling experience. Many of them you can make yourself.
Minimalist trolleys
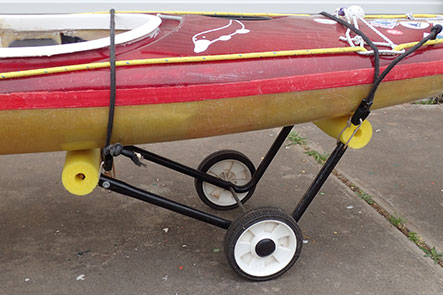
On the ground, canoes and kayaks are awkward bulky objects, often needing two people to move them safely. Trolleys are the usual answer, but wheelbarrows work well enough with one wheel, so why not one-wheel trolleys?
These single-wheel trolleys are made for use on hard surfaces, across the car park and down the ramp, and are custom made for each boat. They’re small enough to fit through small-diameter hatches, and are held in place with shock cords hooked to decklines.
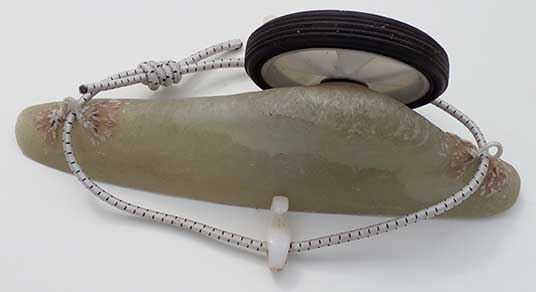
The ‘shoe’ is laid up over the inverted hull, protected with masking tape and mould release agent. When that’s set, the axle is added, with the boat propped up so that the axle is vertical and does not need to be supported while the resin sets.
When that is all set, it is pulled off the hull, trimmed, and retaining shock cords, etc. added.
On some surfaces it is better to push the boat, stern first, rather than pulling it.
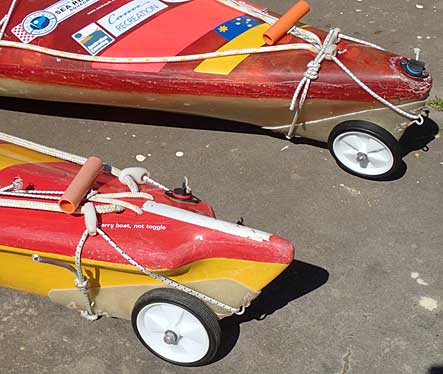
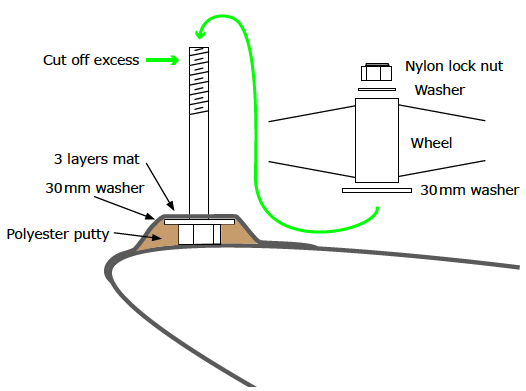
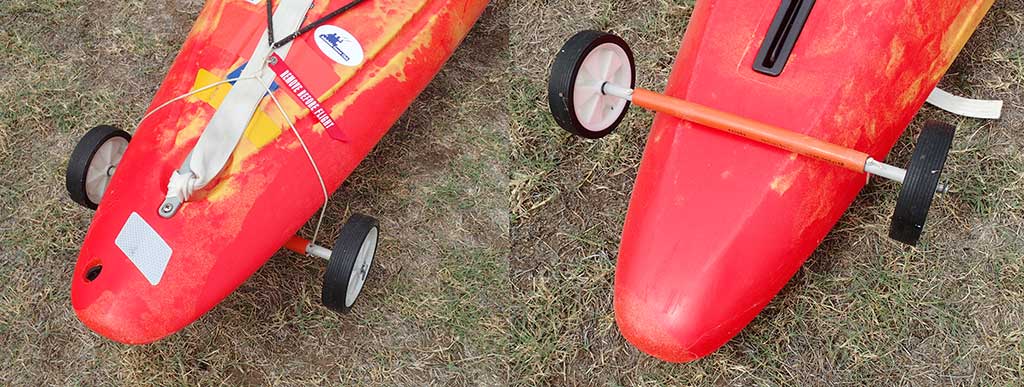
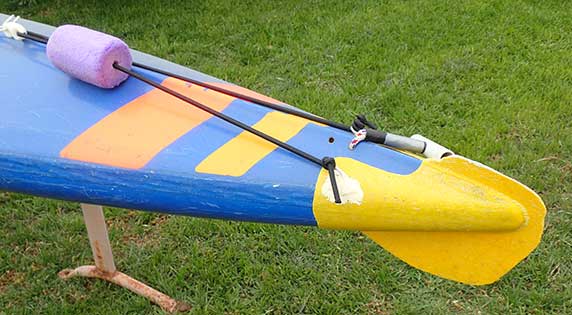
The Karma RG is the wrong shape for a single-wheel trolley to work, so two wheels. Three tubes form the axle. Innermost one is 12.7mm aluminium as the actual axle, then a length of 16mm conduit (grey) to space the wheels, and a length of 25mm conduit (orange) to stiffen the assembly. The wheels are held in place with R-clips and can be removed for stowing in the aft compartment. The device is held in place by a loop of cord (white) short enough so that it stays in place where the wheels do not rub on the hull. Through that loop is a length of 8mm shock cord (black) with hooks on the ends to attach to the handgrips on the aft deck.
When the garden mulcher failed I sent the motor to recycling, kept the chassis and junked the rest. With a wooden bar and a couple of lengths of pool noodle it makes a useful trolley on hard surfaces.
I have seen a trolley built on a milk crate as chassis, with an axle through a bottom edge. Bits and pieces can be carried in the crate, along with the boat on top.
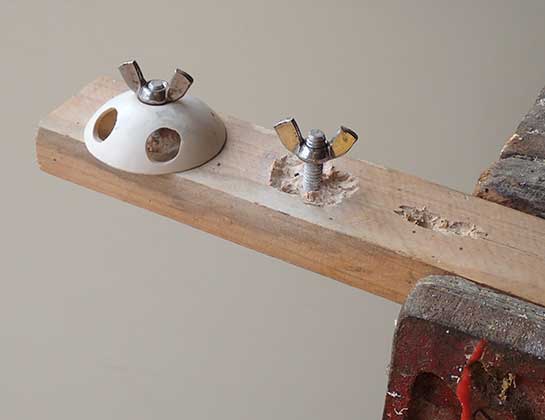
Cheap accessory mounting
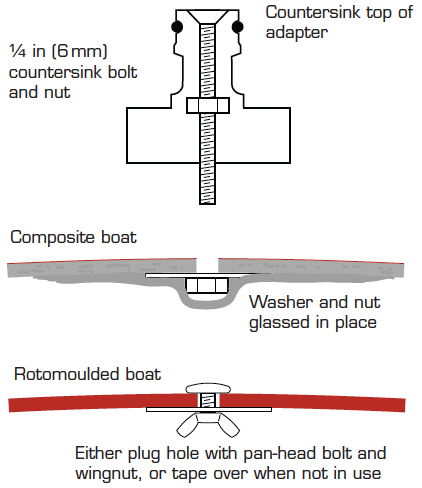
There exist several quick-release accessory mounting systems for masts for flags, all-round white lights for night paddling, etc, with perhaps the Railblaza® StarPort™ best known here. There is also a potential system in the garden section of any hardware store: hose connectors. Bolt a tap adapter to the deck and fix a hose connector to the object to be mounted. On a composite boat you can glass a nut under the deck. For a rotomoulded craft use a pan head bolt and wingnut or tape over the hole when the system is not in use.
For most uses the plastic fittings will be satisfactory. If you need something more robust there are brass versions.
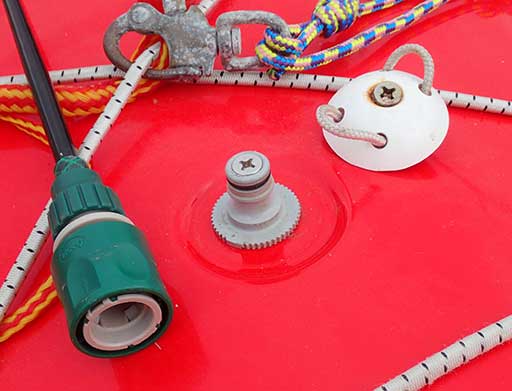
The adapter on the right has been cut down to reduce its height, and is in a depression made for a medallion with the manufacturer’s logo. The dome fitting (see below) to its right is normally in its place. The mast in this pic is part of a discarded fishing rod.
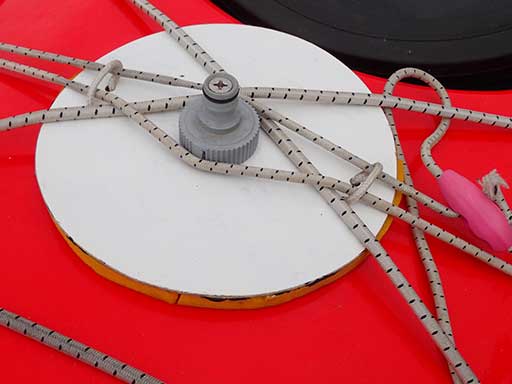
Where you don’t want to drill holes in a boat the adapter can be on a plate secured by straps or shock cords.
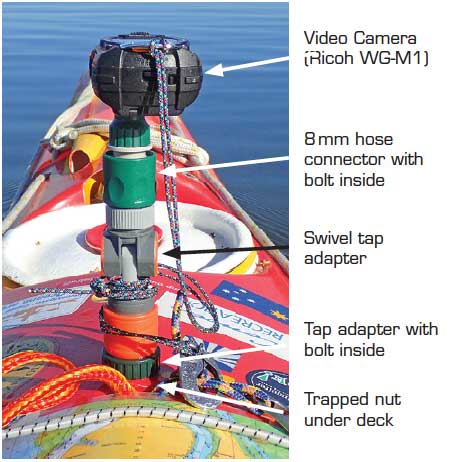
This is a video camera mount using a swivel connector, which allows adjustment in elevation and for the camera to be folded down when not in use.
Perhaps ‘HosePort™’ would be an appropriate name for the system.
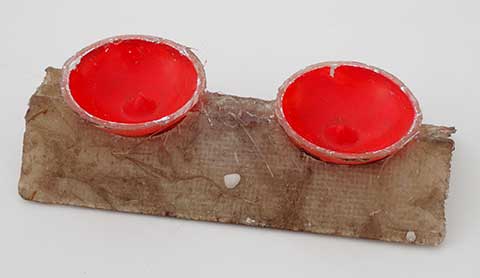
Removable compass mounting

Having a compass that can be added to a boat only when needed can often be useful. In the mid 1990s there was a need for such compasses for a fleet of Valley Skerrays, rotomoulded sea kayaks. The solution was to make some GRP domes, as described below.

Now, the problem is to fit a compass to a SOT kayak. In this case the compass, in an existing dome, is on a platform of 3mm waterproof ply, shaped as shown, and sized so it fits to the footrest rails. It’s sufficiently flexible to be able to spring it into and out of place but firm enough not to wobble or rattle. Of course, a new compass could simply be bolted to the platform without a dome.

The form for the ‘brim’ of the mould was cast on the deck of a Skerray, the dome itself from a plastic bottle, the right size to fit the compass, an Aquameter Ensign with its normal mount and compensator section removed. Layup was two layers of 450gsm mat, with gelcoat on the inside and flowcoat outside. A couple of loops of 3mm cord were added to retain the shock cord used to secure them in place on deck by looping around the decklines, and tensioned with an olive cleat. Rings cut from an old wetsuit were stuck to the undersides to cushion the domes against the decks. Compasses were held in place in the domes with their normal retaining screws.
On the platform, the shock cord is fed through holes in the plywood. This compass is secured in its dome with several dollops of silicone.
Dome deck fittings
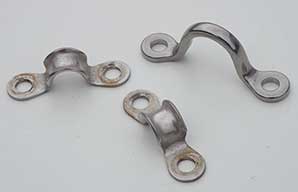
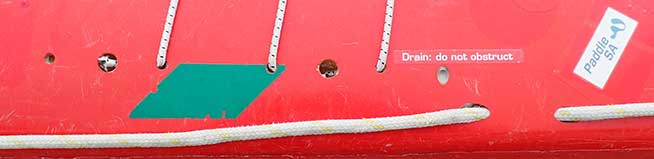
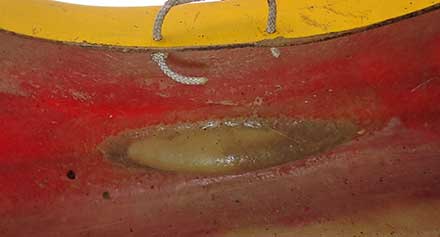
Manufacturers now use recessed fittings for decklines on plastic boats, but what if you want to add lines? I have an aversion to hard deck fittings like saddles, particularly the hard-edged metal ones. (Those in the pic came off other people’s kayaks.) To fit transverse decklines on a number of kayaks I devised a dome fitting, somewhat bulky, but round and smooth and unlikely to cause injury.
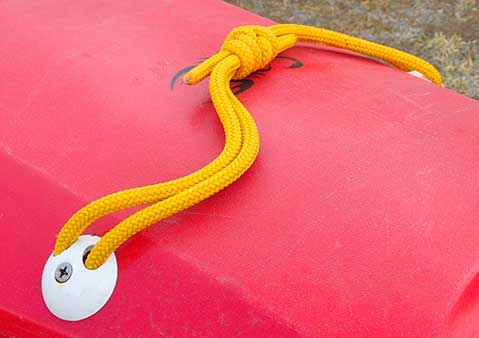
(That transverse loop is something I’ve been putting on boats for years. It gives something to grab midway between bow and cockpit, particularly useful during rescues.)
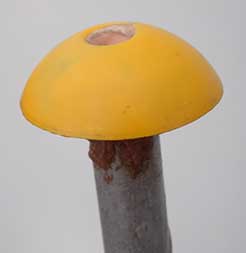
This is the plug, cast in a half tennis ball, and mounted for convenient use. The depression in the top, made with a countersink bit, is to fit the head of a countersink bolt.
The moulds are made on the plug, and then mounted on a support for use. Dome layup is three layers of 450gsm mat.
Drilling the hole in the top is easy enough. To safely drill the others the dome is held to a length of timber held in the vise.
Each dome is held to the deck with a 6mm countersink bolt with a wide washer and nyloc nut inside, and the line around the bolt.
On composite boats the fittings can be on the inside, glassed in to the deck as it is laid up. One layer of glass is used. The deck is reinforced with a small patch of glass at the channel location, with two laid over to secure it. The holes through the deck are drilled later, using a light on the inside for location. (The large holes are for the knot when fitting the shock cord). At right is a mould, one of many required, and below is a view from the inside.
Rear vision
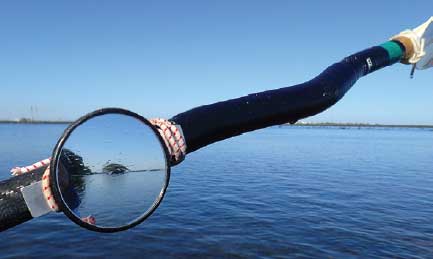
How often have you wanted to take a quick glance behind when turning around would be awkward? In a motor vehicle you’d look in the mirror. Where to put one on a kayak?
The best answer turns out to be near the middle of the paddle. This one is a bike handlebar mirror strapped on with shock cord. Try flat or convex to suit. For checking astern when towing or backing out of a narrow creek a mirror makes life easier.
(Normally you’d keep both hands on the paddle: one hand off here to work the camera.)
Extending the reach
![]()
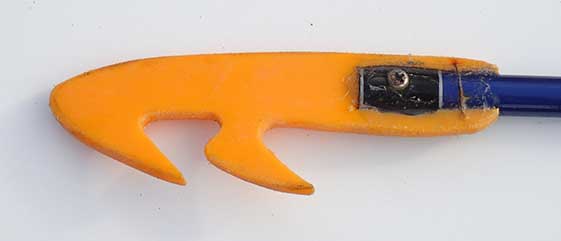
For reaching into the mangroves and for many other uses, a small boat hook, made with part of a fishing rod retrieved from a bin. The hook itself is cut from the piece of deck cut from a rotomoulded kayak to install a hatch. The shape enables it to pick up a line from a flat surface. It’s slotted into the end of the rod and secured with a small bolt and sealed with silicone.
Camera monopod
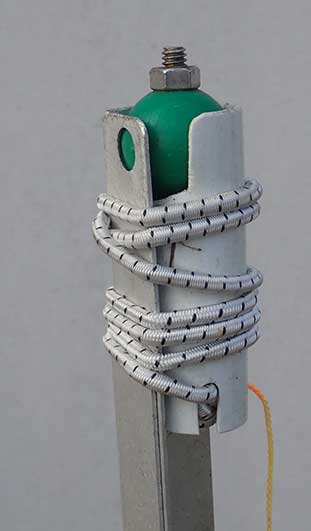
Rather than carry an expensive and bulky tripod I use a monopod of 25mm angle aluminium, the bottom end cut in a V to poke into the sand. The pan-tilt head is based on a 30mm Rope Stop, 72611 in the Whitworths catalogue (green), with a stainless steel bolt. The aluminium has holes to retain the ball, held in place with a piece of PVC pipe with shock cord wrapped around. It works with light cameras, not heavy SLRs and the like.
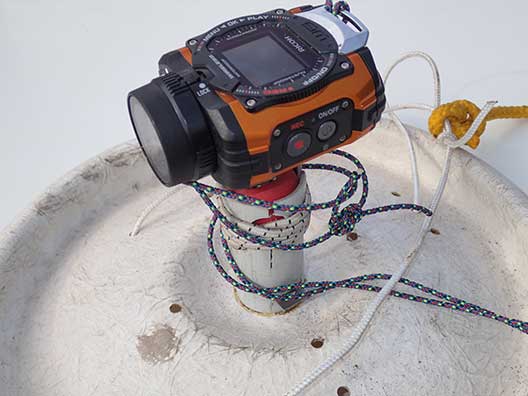
TV programmes about trains often have a shot taken from between the rails with the train running overhead. For the paddling equivalent the camera has to be on the bottom in shallow water. This mount is a variation of the monopod head, attached to a disused hatchcover. The yellow rope floats out of camera view, and is there to locate and lift the camera.

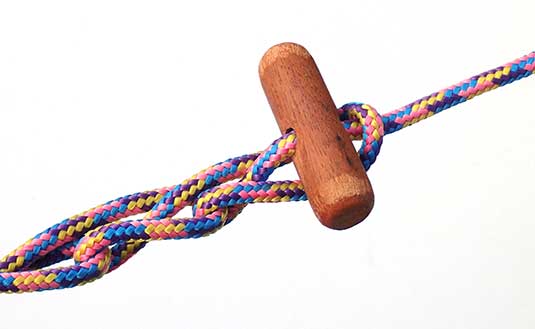
Toggle and loop towline connection
Towlines conventionally have some form of snap hook to connect to the boat being towed. Being metal, they then need floats so they don’t sink. Besides the cost of the snap hook there’s the bulk of the float.
Palm Equipment in the UK makes a plastic clip but it seems not to be available as a separate item here, and reviews of it are mixed. I made a couple with polyethylene and plywood for the tethers I use for drone flying off water, but I would not trust them for towlines.
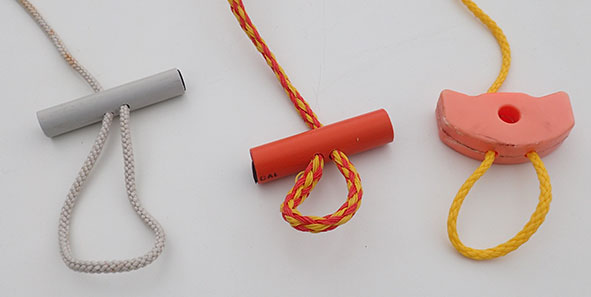
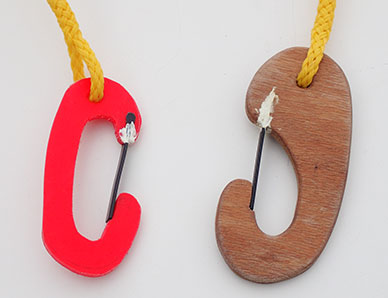
Toggles have been used to connect ropes for a very long time, as you can see from the Ashley Book of Knots, p 317, knots 1919–1924,and there’s no reason not to use them on towlines. This system has the line through the toggle to form a loop that can be opened and closed as needed. The toggle is its own float. (If you’using conduit fill the toggle with buoyancy material.) That one on the right is the handle from a broken traffic bollard.
If the boat to be towed has a toggle on the bow the loop is used to connect.
For a boat with a handle the loop is passed round the handle and then over the toggle.
The towing end is the usual quick-release belt, snap shackle, cam or clam cleat or Getaway hitch. As always, there must be a quick release on at least one end.
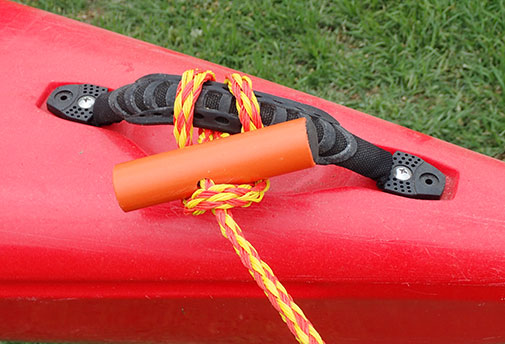
Here again there is an alternative, a loop secured by a toggle. Pull out the toggle and the line releases. On this boat the loop is around the deckline, with the toggle attached to the towline. This toggle is cut from a piece of HDPE, but it could be dowel, an R-clip, etc.
By using a Prusik loop the connection can be moved fore and aft on the deckline as needed. Several variations are possible. The toggle here is a 15cm bit of the tongue strip used to join flooring panels.
Save money and bulk.
A toggle, free to run the length of the line, can be used to stop a chain sinnet unravelling in place of a clip or knot.
Historical note
Until the late 1970s kayaks normally had end loops, loops of at least 6mm cord big enough to put a whole hand through to act as carrying handles. Slalom rules still specify such loops. But they can be a hazard, as Derek Hutchinson wrote in the August 2005 issue of Sea Kayaker, p 7:
It was while doing a BCU Proficiency Test in the North Sea during the early 1960s that the problem came to light. During a swim and tow to shore, my kayak started to rotate in the waves. The loop I was holding twisted around and very nearly amputated two of my fingers. This was obviously not a good state of affairs. When I got home, I made some front and rear toggles out of some bits of deer antler I had lying around. These worked well. It meant I could carry my boat comfortably and yet still allow the kayak to rotate freely in my hand during a swim to shore...
I first made toggles of 19mm dowel, now of 25mm conduit.
These days most people seem to think toggles are just for carrying, but the original intent was for a secure grip at all times.
Historical note 2
During WW2 special forces troops carried toggle ropes, 1.8m long with a toggle at one end and a loop spliced into the other. They could be quickly joined to make long ropes, ladders, bridges, etc. or singly to wrap packages. Troops still carry ‘toggle’ ropes, now usually with loops on both ends, some of rope, others of tape.
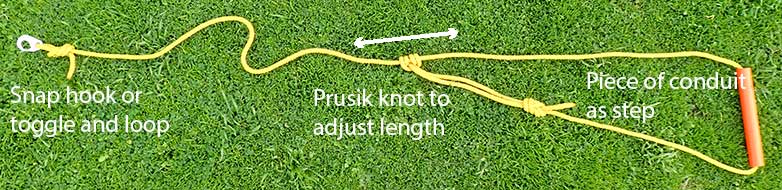
Reboarding stirrup
In early July 2024 ABC News reported that a couple of kayak paddlers had been rescued off Hinchinbrook Island by a sail training ship. One of them had capsized and was then unable to reboard. The paddler, a woman in her mid 50s, then spent “three or four hours” hanging on to her kayak, which had been tied to her partner’s boat.
AMSA had directed the ship to the scene after receiving a signal from “a man-overboard button”: EPIRB, PLB or AIS MOB beacon was not specified. By the time the ship arrived the woman was hypothermic, and was transferred to a helicopter for flight to Cairns hospital. The male kayaker was taken to Cardwell by local VMR.
The question is: Why was she unable to reboard? Was she physically incapable, or did they, between them, not know how? Whatever, why were they in conditions described as “choppy” without that ability? We would never take people to sea unless we were satisfied that they could be rescued without drama.
But in training and tour situations Instructors and leaders may have to deal with people who may not have the strength or swimming ability to reboard by either swimming over the side or by heel hook. Some kind of rescue stirrup may help.
This one is of about 4 m of 6 mm floating rope, about 15 cm of conduit, and either a snaphook or toggle and loop. To make it, first make the loop on the end and form the Prusik knot on the conduit. Thread the free end through and then slide the conduit out of the knot into position. Attach the snap hook or toggle and loop to the end.
To use it, clip it to the deckline of the rescuer’s kayak and drape it over the swimmer’s. As with a swim re-entry, it’s better to come across from a horizontal position than up from vertical.
Desktop demonstrations
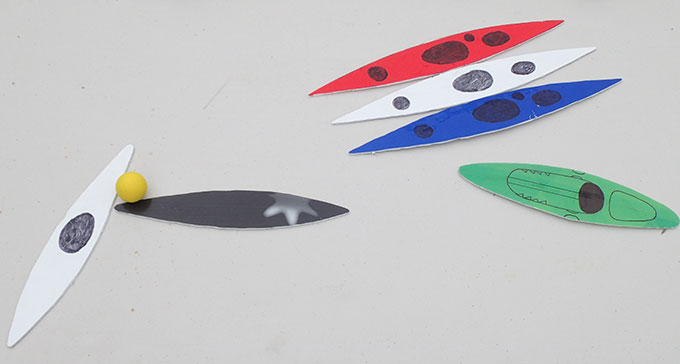
Often Instructors must explain a procedure off-water and need something concrete to make things clear. Here’s a demonstration of the beginning of an X rescue, just as the rescuer makes contact with the capsized craft. The yellow ball represents the swimmer, holding the bow, and on the side away from the approaching rescuer. The rest of the group has formed a raft to watch. Much clearer than just words, and noone’s getting wet.
Materials were donated (?) by candidates for political office. The two WW boats are 30 cm long, the sea boats 40 cm.
Buoys and other floating things
Participants understand the boundaries of an area better if it’s marked by buoys. They needn’t be complicated or espensive: all you need are some plastic bottles, preferably with handles, enough cord to reach the bottom, and some suitable anchors. You may be able to scrounge the lot.
Buoys can also be used for skill development: “Paddle round the yellow buoy, keeping it on your right, around the red buoy, with it on your left, around the white buoy...” For an interesting exercise, keeping the bow within 25–30 cm of the buoy paddle the boat around it like the hand of a clock.
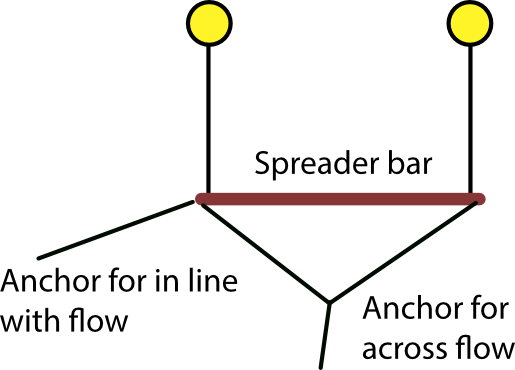
Once upon a time slalom paddlers would practise with the ‘Wiggle test’ through and beside a slalom gate. Gates are awkward to set up but pairs of buoys, about a metre apart, are nearly as good and easy to rig. The pair on the left aligns with the breeze or current, those on the right, across the breeze or current. That means that paddlers work with or against breeze or current, or cross wind or current.
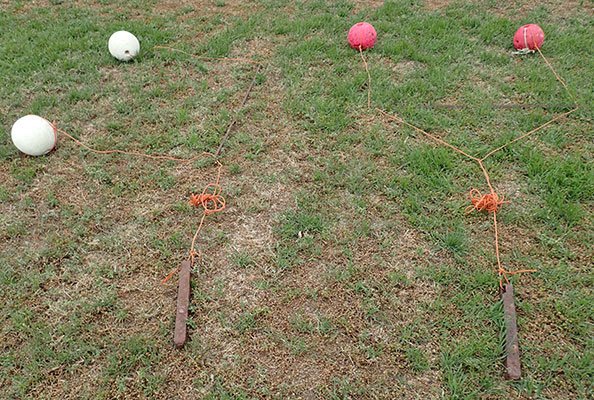
(These buoys are found objects, washed up on beaches. Note the piece of rope on one of the red buoys.)
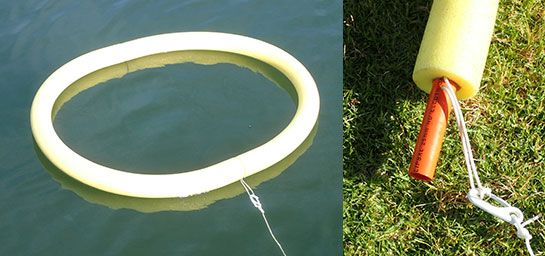
For games where participants are to score goals or collect and deposit items you’ll need some sort of target. Two pool noodles joined into a ring and anchored should suffice. The joiners are lengths of conduit, one end glued into the end of a noodle, the other force fit so that the ring can be taken apart for storage. A loop of cord for the anchor line.
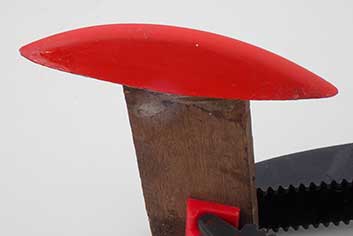
Detachable fins
Whitewater boats are not known for straight-running characteristics, and beginner paddlers can have a hard time putting them where they want to go. In Canoe Building in glass-reinforced plastic (A & C Black, 1974) Alan Byde credits one Mick Powell for devising a neat method of making detachable fins to help with directional control.
A form cut from gloss-surfaced hardboard to the shape of the fin and its flange is fixed to the stern of the kayak with tape and modelling clay. The flat surfaces on the moulds in the pic show the shape. It and the boat are coated with mould release, then gelcoat, then when that is set two layers of glass and resin. When that is set, the form is removed and the other half laid up.
One layer of glass is used to lay up each half of the fin. Before the resin has set the two halves are put together and clamped. The mould in the pic has lugs for bolts to help with alignment and clamping. When the resin has set, take the fin from the moulds and trim it, and attach a means of holding it in place. The one on the blue boat is secured by a length of shock cord hooked to a loop in the deck.
Beginners can paddle their first couple of hours with extra directional stability. They do have to be a bit careful backing on to the beach.
Levers to open hatches and dinghy ports

In the 1970s the hatches used on Nordkapp kayaks and others were the Henderson TCL/4, designed for use on lifeboats. They used a screw-down ring, which was prone to cross-threading and jamming, and had to be tight to be waterproof. To open them a tool was needed to get a firm grip and apply the necessary leverage. The top tool in the pic dates from that time. Fortunately Frank Goodman designed the VCP hatch, which became the model for the black rubber hatchcovers widely used today.
The third tool in the pic is used to seat VCP hatches on Valley boats properly by pushing the lower flange into the recess, and also for levering them open.
Second from top opens TLC/4 hatches and two sizes of dinghy ports, while the fourth, at the bottom, is also for two sizes of dinghy ports, including the one it is lying on.
The materials used for these were either broken plastic paddle blades or a piece of deck cut out to fit a hatch. Marine plywood, e.g. two layers of 6mm could also be used.
The Wiggle test
The Wiggle test was an exercise for Slalom paddlers, but after reverse gates were dropped from Slalom competition (there are now only upstream and downstream gates) it was replaced by other drills. However it can be useful for training and practice.
Back
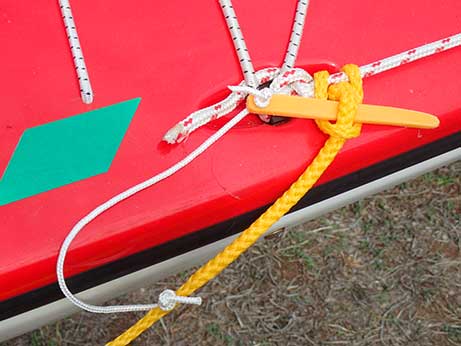
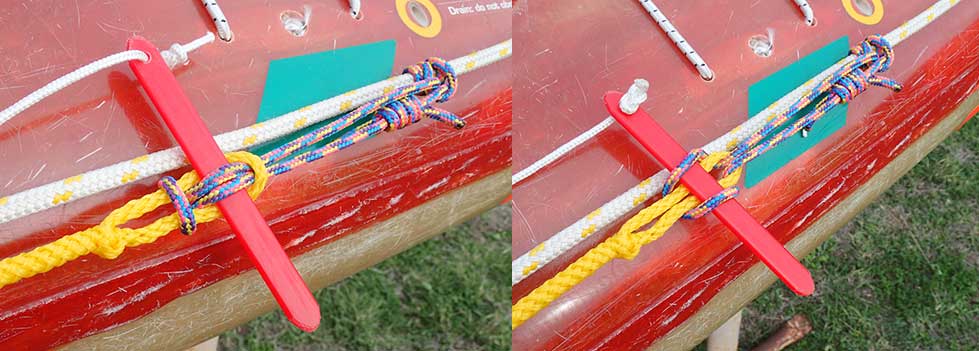
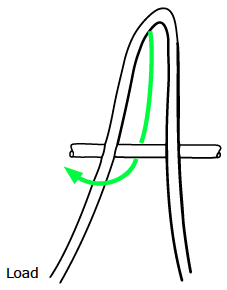
The Getaway hitch
There is some confusion on the web with the names ‘Getaway hitch’, ‘Tumble hitch’ and ‘Bank robber’s hitch’ all being used for the Highwayman’s hitch. In reality, they are similar, but different. The Getaway hitch is easier to tie than the Tumble hitch and more stable and safer than the Highwayman’s hitch, and can be used to make a towline from any suitable length of rope, perhaps a throwbag.
Start by putting a bight of the rope over the deckline or whatever is to be tied to.
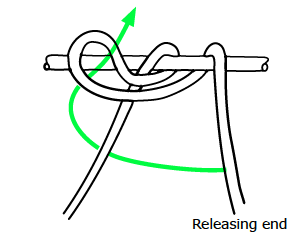
Pull the bight between the two parts and across the load side.
Now pull a bight of the releasing end behind the load side and through the first bight.
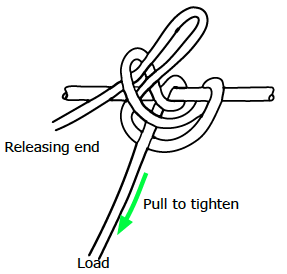
Tighten the hitch by tugging the load side.
Check that it is secure.
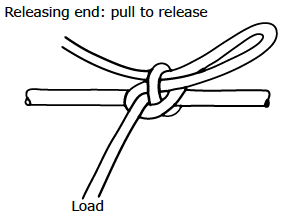
To release, pull the release end and the hitch will collapse.