The X recovery
A brief history...
Some time ago I read a number of BSI theory papers and other documents which all lead me to think that some people have lost sight of reality when it comes to the X rescue. Perhaps the only rescues they’ve ever been involved in have been practice rescues, not the real thing.
What Paddle SA trainee paddlers been reading in the Paddle Australia Qualification Scheme resources has been a description of how I have been doing X rescues, for real, for some 40 years. What I often see people doing is what is drawn on page 139 in Jane and Roy Farrances’ This is Canoeing, published in 1982. In my view, the Farrances got this wrong, and we have been living with the consequences ever since.
The first description I read of the X rescue was in Alan Byde’s Living Canoeing, published in 1969. At that time the generally accepted deep water rescue was the H rescue, which required two rescuing boats, one at either end of the capsized one: a method now thoroughly discredited. Typically for the period, Byde uses ‘canoe’ to mean kayak (pp 168–169):
‘X method
‘On flat water when the patient has capsized neatly and left his canoe with no fuss and the upturned canoe is riding high on the water with little water trapped within it, the X method is indicated. It requires strength, speed and confidence and these are only achieved with practice.
‘I. Arrange the rescuing canoe so that the bows of the upturned canoe are beside the cockpit, and the hull is at right angles to the upturned canoe.
‘2. Grasp the bows and lift them onto the foredeck of the rescuing canoe.
‘3. Pull hard immediately on the deck lines so that the upturned canoe slides quickly over the foredeck until the cockpit is laid across the foredeck of the rescuing canoe. If the cockpit of the upturned canoe is allowed to dwell half in and half out of the water, water will flow in and make rescue by this method impossible.
‘4. There is a moment when the cockpit rim of the upturned canoe reaches the edge of the rescuing canoe, and forms an obstruction to further progress. A sharp jerk with both hands on the cockpit rim of the upturned canoe will swing it further up onto the deck.
‘5. Continue the sliding up of the upturned canoe over the rescuing foredeck until a point of balance is reached. Sway the body weight in the direction that the upturned canoe is moving, the whole assembly will swing over like a see-saw and the contained water will be lifted up and swill out of the upturned cockpit. Tilt the other way once to make sure.
‘6. Note: If the rescuing canoe does not have a spray deck, the water from the rescued canoe will flop into the rescuing canoe and cause difficulty.
‘7. Turn the emptied canoe over and slide it into the water alongside the rescuing canoe. The canoes should be pointing in opposite directions. A two canoe raft is now formed...
‘8. The patient re-enters his canoe by reaching across onto the cockpit of his own canoe from the side away from the rescuer. He kicks his feet until he lies along the surface of the water and then surges up onto his own canoe pulling himself over his cockpit. He may reach further across onto his rescuer’s canoe to gain extra pull. Once across the cockpit he twists around or may even stand up with his hands on the rescuer’s head as he makes himself comfortable in his own canoe.’

Note that he doesn’t say anything about the paddles, but elsewhere he writes ‘Tell the patient to hold his own paddle, your paddle, and the bows of your canoe’ (Black’s Picture Sports: Canoeing, 1978, p 70). In other words, put the paddles into someone’s hand where they will be safe, rather than have them rattle around and get in the way. Other writers, e.g. Walbridge and Sundmacher, Whitewater Rescue Manual, suggest the same idea. As a sea paddler, I’ve always put my paddle in some kind of restraint so that I know where it is and can pick it up again when required. I can appreciate that whitewater paddlers would rather not have lines that snag in passing rocks and things.
Neither Byde not the Farrances give much detail on picking up the boat. Didn’t take long to find the nearer hand on the hull, other hand on toggle or end loop method described below. Stable, gives a good initial lift, and has the nearer hand ready to reach for the cockpit rim. (Why lift the bow, not the stern?)
Byde wrote ‘...water will flow in and make rescue by this method impossible’, and later became a very strong advocate of low volume cockpits that made water flowing in impossible (the integrated cockpit is Byde’s invention). The Farrances seem to have assumed that the capsized boat would be swamped every time. There is a simple answer to this: stuff the boat full of buoyancy (more detail below). The more buoyancy the better. A few minutes work here can save a lot of effort on rough water, especially for inexperienced students and awkward lumps of boats like the Spectrum®.
Compare the Farrances’ diagram of re-entry with Byde’s: the rescuer is not even holding the swimmer’s boat at all. Which is the more stable? Put the peak of the deck in your armpit.
I’ve known that to fail only once: we were both paddling BATs and he was a big heavy fellow, and the whole raft went over. I pushed his boat clear, took my paddle from its restraint, rolled up, and told him to swim. Group on the bank thought it was the funniest thing they’d seen all day.
Where should the paddles be at this stage? Who has the free hand? Hold them underneath the swimmer’s boat, out of the way.
Rescue, or recovery?
There is a trend in the US to use the term ‘recovery’ rather than ‘rescue’. A ‘rescue’ seems to suggest retrieval form a life-threatening or remote situation, while ‘recover’ is similar to picking oneself up after a fall in the snow and continuing downhill. I like the idea, hence...
The rational X recovery
This is not the X recovery—there are variations—this is a method that has been proven to work reliably over many years. I’m using two sets of diagrams here, drawn at different times for different purposes: together, they may clarify things. In one set the paddlers are in touring boats, the rescuer with a paddle leash, in the other they’re in whitewater play boats.
When you practise, start a realistic distance apart—20 metres or so—to give each of you sufficient time to prepare.
Stage 1: Approach
Rescuer
1 Call to the swimmer
2 Plan the approach: you are aiming to arrive, and stop, at the swimmer’s bow
3 Put paddle in leash if using one
Swimmer
1 Leave the boat inverted
2 Hold bow and paddle (How can you tell which end is the bow?)
3 Keep body horizontal, at the surface in whitewater (and in whitewater head for a safe eddy: midstream is not the place for this)
4 Move, if necessary, to the side away from the approaching rescuer. Ignore anything else floating about
Stage 2: Contact
Rescuer
1 Near hand on hull
2 Hand paddle to swimmer (left) or simply put it down if leashed (right)
Swimmer
1 Transfer to rescuer’s bow
2 Hold own or both paddles as required
Stage 3: Lift
Rescuer
1 Nearer hand on hull, other hand on toggle or end loop
2 Lean towards the capsized boat, then push away to gain some impetus. Pull the bow up and over. Reach for the cockpit rim with the other hand (left in this case)
Stage 4: Empty
Rescuer
1 Both hands on the cockpit rim, nearer side slightly higher. (You’d need hands like octopus tentacles to grip the wet, slippery hull)
2 Slide and rock boat on the deck, not cockpit. Don’t try to remove every last drop: you won’t be able to and will just waste time if you try
Stage 5: Re-entry
Rescuer
1 Flip the boat upright, put it alongside on the side opposite from where you picked it up: the two boats are now facing in opposite directions
2 Take the swimmer’s (or both) paddles
3 Lean on the swimmer’s boat, peak of the deck in the armpit, and hold the paddles underneath out of the way
4 The free hand (left in this case) can help drag swimmer, help with spraydeck, etc. if need be
Swimmer
1 Both hands on cockpit rim, feet at surface
2 Pull with arms in time with breaststroke leg action: swim over both boats
3 Keep low, roll face up, wriggle into cockpit.
Personally, I’ve never been fond of the feet-first between the boats re-entry. My preference when recovering junior sprint paddlers with a sea boat is to have swimmers come over my own boat, not their own. Whichever, the rescuer must stabilise the swimmer’s boat until spraydeck is on and paddle in hand. Now is the time to think about retrieving hats, water bottles and other things floating about.
Since this page was originally written the heel hook re-entry has become popular. It’s described on a nearby page: Over...and Still Out. It is a bit awkward in whitewater boats with pillar buoyancy in the cockpit but because it uses leg muscles and puts the swimmer in a fairly stable position it is preferred by many.
The matter of buoyancy
As it comes from the manufacturer, your boat has enough buoyancy to stop it sinking, and in a rotomoulded boat that buoyancy is also supporting the structure. But that’s not enough. As any sea paddler will tell you, you want to be able to paddle a kayak full of water, and have recoveries as easy as possible. Whenever the swimmer has to help to haul the boat across in an X recovery you know something’s wrong. The answer is to add buoyancy.
The major manufacturers supply optional air bags for their boats, both kayaks and canoes. They’re light, easily installed, and fill the space at bow and stern that could otherwise fill with water. When you want space for carrying gear, deflate them, and reinflate them afterwards. The boat on the left has the manufacturer’s airbags.
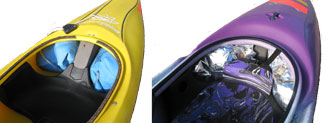
There are cheap alternatives, with wine/fruit juice/spring water cask liners the obvious one, as in the boat on the right. Other possibilities include plastic bottles and polystyrene, although the latter has the nasty habit of crumbling and leaving bits to blow about. Whichever, stuff the boat full and make sure it can’t come out in a capsize.
If it’s your own boat, the extra buoyancy should be permanently installed. If it’s a boat you’ve hired or borrowed for the day, put some in and then take it out before you return the boat.
School fleets are no exception, and students can help with the collection.
Recoveries require effort. You can make the effort to equip boats with buoyancy, or you can make the effort on the water.
Final advice
The validity of a technique does not depend on its antiquity or recency but whether or not it works reliably and efficiently. What I’ve described above has been honed by experience. Go out and practise.